Thursday, 19 June 2014

Wayback Wednesday - The Importance of Ease

I know... it's Thursday.  Late Thursday.  This should have been posted yesterday, but let's pretend it's still Wednesday.

Welcome back to Wayback Wednesday, the day we look back in time at the works of Christine Frederick and other pioneers in home economics.

In New Housekeeping: Efficiency Studies in Home Management, Frederick performs an in-depth review of the ergonomics of washing dishes.  From the height of the sink, to the placement of the tools, to the specific motions of each hand.  The idea being that for work to be performed optimally, it needs to be done with ease.  Physical straining cause by poor ergonomics makes work harder.

Included in her study was a table showing what the proper work surface height should be for people of various heights.

Frederick noticed that many of the working surfaces in her home were not optimized for her height.  This meant that every task she performed was taking more effort than it needed to.  She also tried to ensure that tasks didn't require any unnecessary bending or lifting.  All of these are modern elements of ergonomics for work centre design.
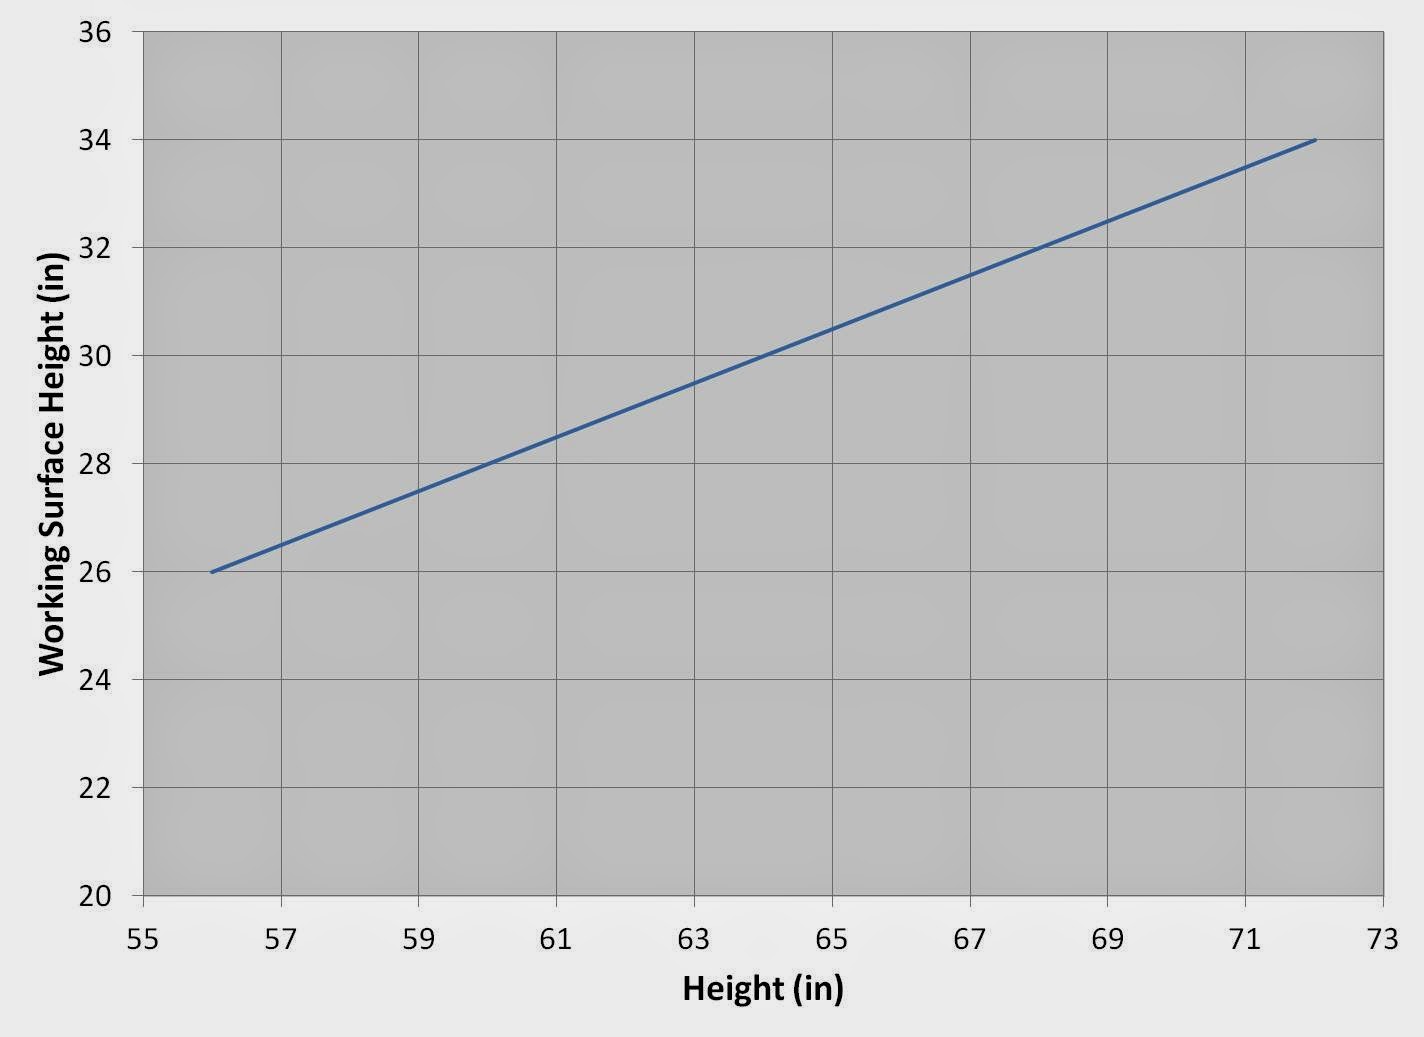
To calculate the correct working surface height, Frederick provided a table and a formula.  I've converted it to a graph here for ease of use.


Ironing is one task that Frederick's suggests would benefit from a proper work surface.  Not only height, but also sturdiness.  She writes;

"In ironing, I found that my boards just like the sink, was not at the right height. It was so high that I couldn't obtain enough purchase on my iron without extra effort. I simply lowered the board, made it very steady, and thus helped my efficiency." (Frederick 1912)

I decided to put her principle of a proper work surface height into practice when I did the ironing this week.  This was a qualitative study, I really should have measured the time it took to iron a shirt with each working surface height.  I might recreate it during another wash day.

Now, I am not a tall person.  Okay, that's probably an understatement, I'm short.  My suggested working surface height is 28 inches.  I have been setting up the ironing board at 32 inches.


The difference can really be seen in the angle of my elbows.  At the lowered working height, my arms are almost straight down at a more natural angle.  At the original height, I had to hold my arms in a bent position.

Sure enough, the lower board felt much more comfortable.  It took less effort, less strength and I was able to finish quicker.  

So how does this compare to present day ergonomic standards?

Ironing these days is very different than ironing in the early 1900s.  Electric irons were just being released.  You were lucky if you had one that was self-heated using coal or gas, these novelties were considered great time savers.  Frederick wrote that an electric iron in 1912 would have cost $6, that is a cost today of almost $150.  Would you spend $150 on an iron??


Needless to say, using a coal heated iron, or a metal one that needed to be heated on a stove is a lot heavier than a plastic one from today.

The Canadian Centre for Occupational Health and Safety has a good graphic that shows the different standing work surface heights for different types of jobs.

http://www.ccohs.ca/oshanswers/ergonomics/standing/standing_basic.html

In this case, heavy work isn't just lifting.  It's defined as work that requires applying a downward force.  It doesn't matter which iron you're using, you need to press down on the iron.

The CCOHS guideline says heavy work should be performed on a surface 7 3/4 - 15 3/4 inches below elbow height, which for average people works out to 25 1/2 - 37 1/2 inches.  My elbow height is about 36 inches off the ground, so a work height of 28 inches falls nicely in this range (for a short person).

So for the last 18 years, I've been setting up my ironing board 4 inches too high.  I'm guessing this is because my father, who is well over six feet tall, taught me to iron.  

I wonder if he knows he was setting up the board two inches too low?

Wednesday, 21 May 2014

The Importance of a Safety Stock


Last month, my husband and I did what only seems sane to sleep deprived new parents.  We embarked on a trans-Atlantic airplane trip with our 7 month old... who was on the verge of crawling.

In preparation for our trip I polled all my Mommy friends for advice.  The one common thread:

"Bring more diapers than you think you'll need."


Everyone had an urban legend-esque story of someone who knew someone who got stuck on the tarmac for 8 hours or who's kid came down with a stomach bug somewhere over Greenland.

So we packed a lot of diapers.  30 of them in our carry on for our 6 hour flight and another 25 in our checked luggage to get us through our first day until we could go shopping.

I can see some of you nodding along; yup, that sounds like a good amount.  Had we been backpacking through a Costa Rican jungle, it would have been a good amount.  We were travelling to a major metropolitan area in an English speaking country.  And we were staying with family.  And we were only gone for 10 days.  It was more diapers than I thought I would need.

We ran out of diapers the day before we came home.  And being the diligent parents we are, bought 30 more for the flight home.  We typically cloth diaper, so three weeks later we used the last vacation diaper.

This got me thinking.  What is "more than you think you'll need"?  Really, what we're talking about is Safety Stock.

Safety stock is the inventory you hold to insure against a stock out situation.  Stock outs can be costly, especially if they bring production lines to a standstill or incur customer penalties for late deliveries.  In this instance, running out of diapers midway across the Atlantic could be disastrous, we would want to ensure that our safety stock protected us 99% of the time.

When picking your safety stock you need to think about the holding costs of the inventory vs the costs of a stock out.  In my case, diapers are small and light and infants get their own baggage allowance.  We had plenty of space so the holding costs were small.  The cost difference between buying diapers at home and buying them abroad was negligible (<$10 for the week).  There was the lost opportunity costs associated with packing other items, it could have saved me having to do laundry half way through our trip.

Running out of diapers is far more costly than bringing lots of diapers.

So the more diapers the better.  But maybe there is a more realistic estimate than 55 we schlepped across the ocean (and the 30 we carried back).

Our total travel time was going to be 12 hours, but we didn't want to have to go shopping as soon as we landed so we'll assume we wanted a full 24 hours worth of diapers.

Using the tracking data I covered in the Sleep Post, I generated a histogram showing the daily demand for diapers.  I had 75 days worth of data and it graphed like this:


As expected, the data more or less has a normal distribution (the red line on the graph).  The median value was six, 27% of the time six diapers were enough to get us through a 24 hour period.  The standard deviation was 2.  What this mean is that 10 diapers will suffice for a 24 hour period 99% of the time.  The caveat being that this only holds under the conditions seen during the 75 days of data.

So let's make some assumptions on what the worst case scenario would be.

1) The flight is delayed.  We had one connection, but it was also in a city where we had family.  If we weren't on the plane, we would only tolerate a 6 hour delay before it would make more sense to leave the airport.  If we're stuck on the tarmac, well lets assume that can't be more than 8 hours.  So now our 12 hour transit time becomes 20 hours.  Still within our 24 hour assumption, so we wouldn't require any additional diapers, but we'd have to go shopping shortly after arriving.

2) Our diaper usage in a 24 hour period is higher than expected.  So let's say the little monkey comes down with some sort of virus and we're changing diapers at the rate of 1 an hour.  24 hours, 24 diapers.  And we still don't have to go shopping upon arrival.  But we may want to find a doctor...


So the 55 I packed... More than twice what I would ever need.

Turns out what I needed more than diapers was a change of clothes, for me.  There's nothing quite like being thrown up on at 30,000 feet.

Blue Skies and Tail Winds.

OpsMama

Saturday, 26 April 2014

Laundry Day - Process Improvements


Welcome back Readers!

This week we’re going to take a look back at the very first Ops@Home topic.  Laundry Day.

To recap, we had looked at ways to eliminate muda, or waste, from the laundry process.  Specifically, we looked at reducing the number of times each article was handled.  Less sorting, less effort, less time.  We also tried to minimize waiting for the washer and dryer by prioritizing the order loads get washed.

The experiments have been conducted, the results collected.  Data has been graphed and scrutinized and analyzed.  And here it is.

Let's start off with some assumptions:
  1. I didn't count and inventory each article of clothing.  I'm assuming a week's worth of cloths is about the same from week to week.
  2. I didn't include the baby's laundry which gets done multiple times a week or sheets and towels.  This was strictly done using the clothing of two adults.
  3. Time required to hang dry clothes was not included.  This varies depending on the temperature and humidity of my house or if the clothes are hung outside.
The initial process split the clothes into three loads, Cold Wash (Blue), Warm Wash (Red) and Delicate Wash.  In my case, I had too much clothing in the delicate pile for one load so it was split into two (Green and Purple).

This is what the time study for laundry day looked like:


From start to finish it took 5 hours and 42 minutes.  Now, a lot of this was hands off time as the washer and dryer runs automatically, the beauty of modern conveniences.  However, there was still intervention required during the sort, hang and fold operations.

One of the proposed changes was to eliminate the initial sort step by having a divided hamper and separating the clothes when they are placed in the hamper.  This seemed like a great idea, but from the time study you can see that this step really only took 5 minutes.

The cost of a new divided hamper would range from $40 - $100, which is a significant investment for little time savings.  The advantage to the sorting would be in the ability to easily delegate laundry to another member of my household.  The instructions for how things needed to be washed could be put on the bags and when a bag is full, anyone could toss it in the laundry.  Still not really worth the money for a new hamper.

So what did the revised process look like?


Looks better, doesn't it!  The process improvements brought the total time down to 3 hours and 50 minutes.

That's a savings of almost 2 hours!

A big time savings came from splitting the delicate load into two; one that went in the dryer and one that was hung to dry.  This eliminated one full dryer cycle, which doesn't eliminate much labour, does save on energy. The revised process also removed the bulk of the user intervention between wash and dry cycles.  Much less effort and labour.

To prioritize the loads, I used Johnson's Rule for n jobs on two machines.  This meant that the hang to dry load is done last, as it doesn't require the use of the second machine (the dryer)

During the summer, I hang the clothes outside to dry on the line and try to get them out as early as possible to try to maximize their time in the sun.  In that case, I wouldn't use the Johnson's Rule to prioritize the loads and would do the Hang to Dry load first.  Changing only the order of the loads in the Revised Process, we can see Johnson's Rule at work.


When the Hang to Dry load is done first, the dryer is idle until after the second load goes through the wash.  This extends the process time to 4 hours and 26 minutes.

Here is what the three versions of the process look like in comparison.  As you can see, even the ordering of the loads can have an impact on the process time.


So going forward, I'll skip the divided hamper and keep sorting and washing the loads as follows:
  1. Delicate Wash, Perma Press Dry
  2. Cold Wash, Normal Dry
  3. Warm Wash, Normal Dry
  4. Delicate Wash, Hang to Dry
At least until it's warm enough to hang the clothes outside.

Happy Wash Day!

Wednesday, 9 April 2014

Wayback Wednesday - The New Housekeeping Cookbook

Welcome to the first Wayback Wednesday at Ops@Home!

What's Wayback Wednesday you ask?  It's when we take a look at the work of a pioneer home efficiency engineer and see how we can apply it to the 21st century.    Today we're looking at the work of Christine Frederick and her "New Housekeeping Cookbook."

First, a little about Mrs. Frederick.  Christine Frederick was a university educated wife and mother at the turn of the 20th century.  Working in the home, she found that her days of housework and child rearing were leaving her exhausted at the end of her day and not feeling like she had adequately discharged her duties.  She also found she had little time for her own pursuits, socially and intellectually.  Her husband was a business executive who along with his colleagues were interested in how the work of Frederick Taylor and the other efficiency engineers of the day were benefiting businesses.  Mrs. Frederick saw this new science as an opportunity to improve her life and began to conduct Taylorist work studies within her own home.  These experiments became the basis for several publications beginning with "The New Housekeeping: Efficiency Studies in Home Management"

Frederick took "adequate, immediate and reliable records", one of the main tenants of efficiency engineering, and created an elaborate home record system using index cards and file boxes.  Part of this system was what she called the "New Housekeeping Cookbook".   In Frederick's day, recipes were often pasted or written into large scrapbooks which became cumbersome as new recipes were added.  With her New Housekeeping Cookbook system, Frederick attempted to solve three problems;

  1. Recipes difficult to find within the book.  They were added to the next blank page rather than categorized.
  2. Recipes often became soiled as it was on the counter during cooking.
  3. Recipes were tucked in before they were tried, filling with book with potentially horrible food.

First, rather than using a scrapbook, Frederick used a card cabinet and index cards.

Frederick, Christine.  Household Engineering: Scientific Management in the Home. 1923
This allowed her to categorize recipes and easily add new recipes in the right order.  Second, she mounted a piece of glass on the front of the box, protecting the card as it was being used.  Third, she only added recipes to the cabinet after they were tested and enjoyed.  Recipes she wanted to try were kept in a separate file.

My recipe storage system looks like this, a large stack of paper and more back issues of Canadian Living than the waiting room at my dentist.  


This system is not useful for finding anything.  If I want to find a recipe that I've made before I need to remember if it was in the July 2008 or February 2004 issue.  Nor is it really helpful when I'm trying to come up with ideas for meals.

I also have a recipe binder which is full of wonderful things neatly divided into standard categories.  Meat, Fish, Vegetables, Grains etc. 


It has great recipes, like the one for mini eclaires I cut out of a magazine 7 years ago.  I've never made a mini eclaire, but you know... one day.  I never go to the binder when I'm looking for things to cook, except when I do the Christmas baking.  Why?  Because I have to flip through pages of things like Brined Turkey and Steamed Monk Fish to find something I could make in 20mins on a Wednesday night.  It was also so full of recipes I had never tried, there was no room left to add new favourites.

Needless to say, my system needs some work.  Looking at Frederick's system there are definitely some things I can apply.

Rather than using index cards, I'm going to stick with a three ring binder and page protectors.  These provide the same flexibility and protection as the cards, without needing to rewrite or cut and glue recipes.  Plus, I like pictures.

The first thing I implemented is the separate file for recipes I haven't tried yet.  This cut the binder contents down by almost two thirds.  Now every week I pull a new recipe out of the folder and test it out.  If we love it, the recipe gets filed in the binder. If not, it gets filed in the blue bin.  The Trout Provencale en Papillote was a keeper.  The Roasted Eggplant Dip was not.

Turns out a lot of the recipes I've been storing for years (in some cases a decade) weren't really worth keeping.

The second thing I did was change how I stored the recipes.  Frederick sub-divided her Meat category into "Requiring One Hour or Less" and "One to Four Hours".  I took this idea and used the following categories:
  • Weeknights
  • Sides
  • Lunches
  • Occasions
  • Slow Cooker
  • Desserts
  • Baking
  • Other

This way when I'm meal planning I can easily skip passed the Monk Fish and get right to the Vietnamese Beef Pho.

The next step was working through the stack of magazines to actually clip out the recipes I thought were interesting.  I realized a lot of what I was storing were ads and out-of-date fashion advice.  More fodder for the blue bin.  This is still an on going exercise but at least I'm no longer adding new magazines to the pile.

Another idea of Frederick's which I think has a lot of merit are her Menu Cards.  When she planned a menu for a dinner or luncheon and she thought it was particularly successful she wrote it on a card and stored it in a special section.  This meant she wasn't trying to recreate a full menu every time she was planning a party.

What I'd really like to know is if anyone has a way to do this digitally.  Any great ideas that could allow me to retire my scissors?


Thursday, 27 March 2014

Inventory Control - What's in your Kitchen?


Ahh inventory... The ultimate Catch-22 of the production world.  Too much and you waste space, tie up money in WIP and risk loss, damage and obsolescence.  Too little and you risk bringing the whole line to a halt.

Good inventory management balances the risks (and costs) with the operational benefits (flexibility and protection).  I've heard inventory described as an insurance policy, or the peaceful ocean that conceals the jagged rocks of production problems below.

There are ways to minimize inventory through proper production planning and just-in-time (JIT) strategies. However, you can never totally eliminate all inventory.

Try to imagine your kitchen with no inventory.  No pantry.  No refrigerator.  Supplies arrive just as they are needed and only the exact amount that will be eaten is cooked.  Sounds ideal doesn't it? No leftovers to turn green and furry in the back of the fridge.  No lettuce liquefied in the crisper drawer.  No can of beans lost for a decade.  Nice, but not practical in real life.

First, there is the problem of minimum order quantities. I've never come across vanilla extract sold by the teaspoon.  Second, there are the added costs of shopping everyday.  Unless you happen to live or work in the same building as a Bulk Barn and green grocer, you will waste a lot of time everyday.  Third, buying just the quantities we need eliminates our ability to capitalize on price breaks for buying in larger quantities.

So what's in your kitchen... er, my kitchen.  There are lots of food type items in my kitchen from produce to pasta and meat to mustard.  I am a baker, so I usually have 3 or 4 different types of flour.  We also have in stock 3 or 4 different types of rice.  We have a pantry, a refrigerator and a chest freezer.  We are well stocked.


Not every item in my kitchen requires the same level of monitoring and attention.  Just like not every item a company buys gets the same level of attention.  A critical component that costs thousands of dollars and takes weeks to order in will be monitored much more closely than say, toilet paper.

Splitting inventory into categories is often done in an ABC system based on annual dollar volume.  A being the top 15% , B the next 35% and C the remaining 50%.  The key here is VOLUME, not unit cost.  A 5 gram tin of saffron can cost upwards of $20.00 but will last you may months.  According to the USDA Weekly Beef Report (yes, there is such a thing) you can spend $15.99 on a pound of fillet mignon that gets consumed in one meal.  In a given year, you probably spend more on carrots than you do on saffron.

Typically, you would have an ERP system that could calculate this all out for you and you'd know exactly which items are in which category. I don't have one of those.  I could calculate it out by hand, but frankly, I don't have that much time on my hands so we'll make some assumptions.


Splitting the items this way makes it easier to make the shopping list because I'm not reviewing every item in the kitchen to see if we need more.   Some 'A' items are restocked on a weekly basis, things like fruit and veggies.  Other items in this category are bought as needed based on the meal plan, cuts of meat or unique produce.  'B' items are restocked when they reach a minimum safety stock, when we are down to one meal worth of pasta or rice.  'C' items are only replenished when we run out.

Now, on to how much to buy.  The easy answer is "as much as you need", but there are a few factor to consider:

1) Is the unit price less for larger package sizes?
2) How much space do you have?
3) What is the shelf life?

Let's look at an example, All-Purpose Flour.

You can buy flour in very small quantities at a bulk store or 20 kg bags at a wholesale club store, and the unit cost will vary considerably.  Flour also has a shelf life, 10 - 15 months according to Good Housekeeping and less if you live somewhere hot and humid without air conditioning.

I price checked All-Purpose Flour this week and here is what I found:


At first glance, the wholesale club pack looks like a bargain (we're going to ignore membership costs here), it is less than half the unit price of the 5 kg bag.  But is buying a 20 kg bag of flour really a good idea?

To give you an idea of how much flour that actually is, you're looking at approximately 40 loaves of bread worth. A full bag is approximately cubic foot in volume, which is a lot to store in a small kitchen.  

So let's say you have the room for a 20 kg bag, when does it really become a good deal?  Take a look at the graph below.  Assuming the flour will be stored properly and has a shelf life of 12 months, you can see at which quantities each option is the best deal.


If you use less than 4 kg of flour a year, then buying from the bulk store is the more economical option.  Between 4 and 5 kg, you are better off buying the 5 kg bag at $8.49.  If you will use more than 5 kg of flour in a year, the 20 kg bag is the most economical option at $11.99.  But what about holding costs?

I did the math on the holding cost of a 20 kg bag of flour in a rented 610 sq ft condo in Toronto.  Based on the volume of the condo and the volume of the flour, less than $5.00 of your annual rent would go to storing the flour.  In this case, it's not about the dollars, it's about the opportunity costs.  Storing the flour means you can't store something you might need or want more.  

So now you know what you have and how much of it you are going to buy.  But how can you keep track of it?

Here it is, Ops Mama's 3 Rules for Inventory Management in your kitchen.

1.  "Out of site, out of mind".  

Stick with containers you can see through and try to keep like with like.  Also, if you have a chest freezer that isn't in your kitchen, keep an inventory on your refrigerator door or inside your pantry.  That way you can see your entire stock from one room.  I use a sheet of white board stuck to the inside of the pantry door.


Next, the see through containers.  I try to use containers that I know the approximate volume of.  Canning jars are great for this, they come in standard sizes so I can quickly approximate how much is in the container.  This will also keep dry goods fresher and safer from pests. 


Avoid having items too many rows deep on a shelf, it is too easy to forget what is tucked away at the back. Yes, this is my pantry. And yes, I have an unhealthy relationship with my label maker.  But it sure is easy to find things when I'm cooking.


2.  "Know when you're going to run out, before you run out".   

This especially applies to items that don't get measured every time they are used and are always kept in stock, things like spices and oils.  Or toilet paper.

For these items, I use a two bin system.  One container is for daily use and is replenished as needed from a larger container stored separately.  When the larger container is empty, there is typically enough in the small container to last until more can be purchased.


3.  "First In, First Out".  

When you make your weekly meal plan, take a look at what you have in stock.  Is there something in your freezer or fridge that is about to reach it's expiry date?  Do you have the dregs of several types of frozen veggies that can go in a quiche or stir fry?  Use them up first.  Then decide what needs to be bought to meet your weeks planning needs.

So dear readers, now it's your turn.  What do you do to keep your refrigerator from filling up with petri dishes of mold?  How do you make sure you have the ingredients you need?

P.S.  The label maker is optional.