Showing posts with label Laundry. Show all posts

Thursday, 19 June 2014

Wayback Wednesday - The Importance of Ease

I know... it's Thursday.  Late Thursday.  This should have been posted yesterday, but let's pretend it's still Wednesday.

Welcome back to Wayback Wednesday, the day we look back in time at the works of Christine Frederick and other pioneers in home economics.

In New Housekeeping: Efficiency Studies in Home Management, Frederick performs an in-depth review of the ergonomics of washing dishes.  From the height of the sink, to the placement of the tools, to the specific motions of each hand.  The idea being that for work to be performed optimally, it needs to be done with ease.  Physical straining cause by poor ergonomics makes work harder.

Included in her study was a table showing what the proper work surface height should be for people of various heights.

Frederick noticed that many of the working surfaces in her home were not optimized for her height.  This meant that every task she performed was taking more effort than it needed to.  She also tried to ensure that tasks didn't require any unnecessary bending or lifting.  All of these are modern elements of ergonomics for work centre design.
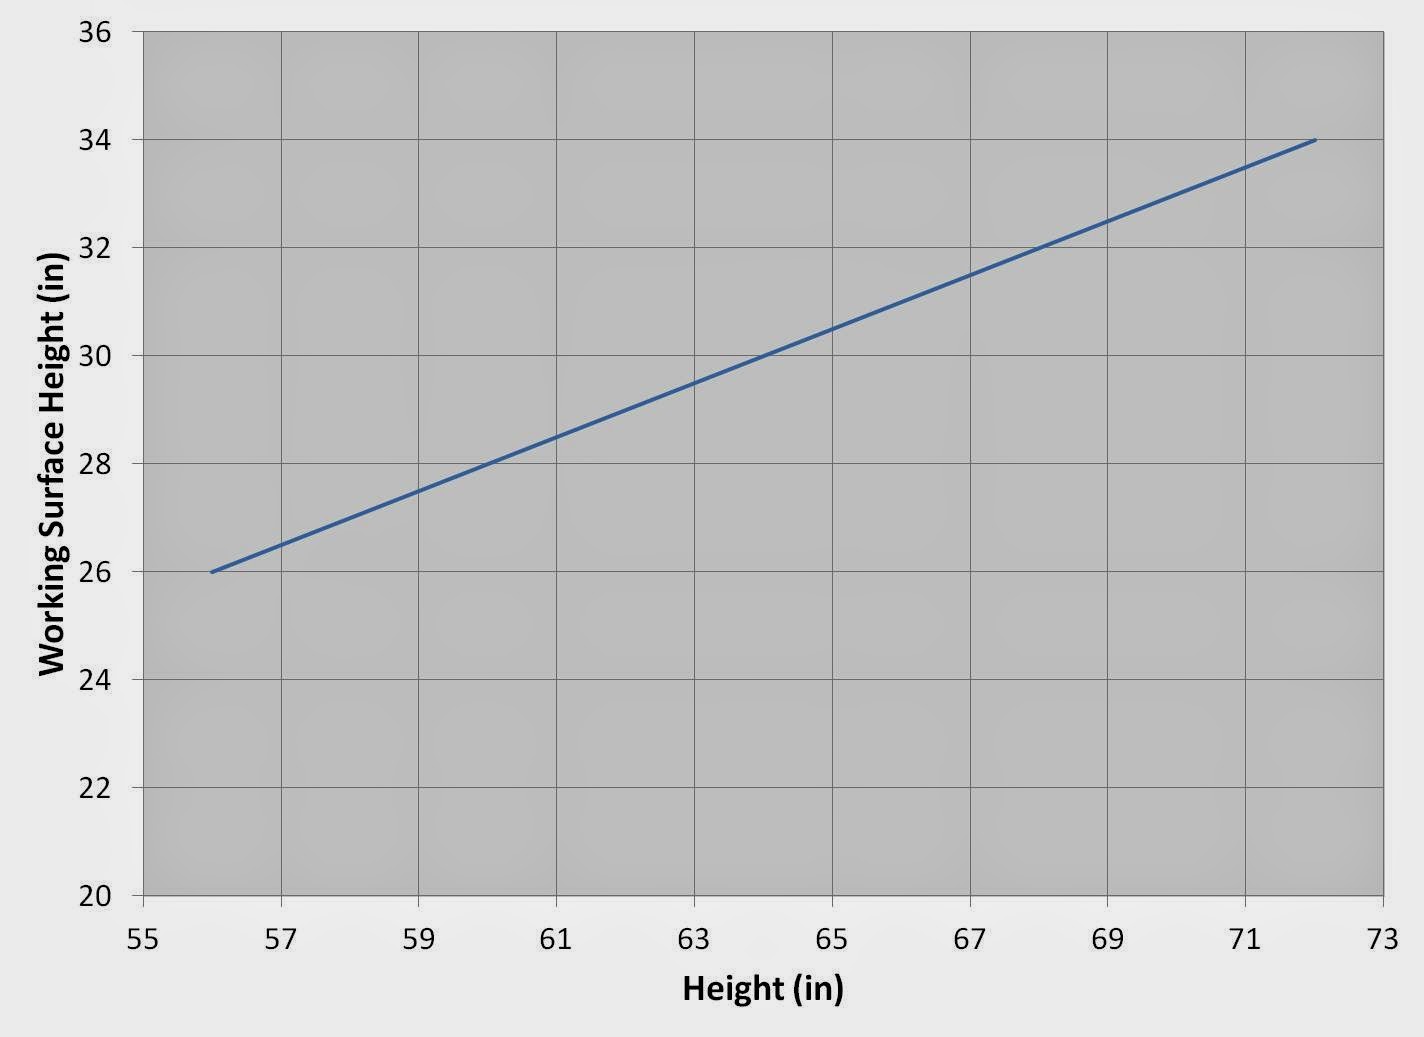
To calculate the correct working surface height, Frederick provided a table and a formula.  I've converted it to a graph here for ease of use.


Ironing is one task that Frederick's suggests would benefit from a proper work surface.  Not only height, but also sturdiness.  She writes;

"In ironing, I found that my boards just like the sink, was not at the right height. It was so high that I couldn't obtain enough purchase on my iron without extra effort. I simply lowered the board, made it very steady, and thus helped my efficiency." (Frederick 1912)

I decided to put her principle of a proper work surface height into practice when I did the ironing this week.  This was a qualitative study, I really should have measured the time it took to iron a shirt with each working surface height.  I might recreate it during another wash day.

Now, I am not a tall person.  Okay, that's probably an understatement, I'm short.  My suggested working surface height is 28 inches.  I have been setting up the ironing board at 32 inches.


The difference can really be seen in the angle of my elbows.  At the lowered working height, my arms are almost straight down at a more natural angle.  At the original height, I had to hold my arms in a bent position.

Sure enough, the lower board felt much more comfortable.  It took less effort, less strength and I was able to finish quicker.  

So how does this compare to present day ergonomic standards?

Ironing these days is very different than ironing in the early 1900s.  Electric irons were just being released.  You were lucky if you had one that was self-heated using coal or gas, these novelties were considered great time savers.  Frederick wrote that an electric iron in 1912 would have cost $6, that is a cost today of almost $150.  Would you spend $150 on an iron??


Needless to say, using a coal heated iron, or a metal one that needed to be heated on a stove is a lot heavier than a plastic one from today.

The Canadian Centre for Occupational Health and Safety has a good graphic that shows the different standing work surface heights for different types of jobs.

http://www.ccohs.ca/oshanswers/ergonomics/standing/standing_basic.html

In this case, heavy work isn't just lifting.  It's defined as work that requires applying a downward force.  It doesn't matter which iron you're using, you need to press down on the iron.

The CCOHS guideline says heavy work should be performed on a surface 7 3/4 - 15 3/4 inches below elbow height, which for average people works out to 25 1/2 - 37 1/2 inches.  My elbow height is about 36 inches off the ground, so a work height of 28 inches falls nicely in this range (for a short person).

So for the last 18 years, I've been setting up my ironing board 4 inches too high.  I'm guessing this is because my father, who is well over six feet tall, taught me to iron.  

I wonder if he knows he was setting up the board two inches too low?

Saturday, 26 April 2014

Laundry Day - Process Improvements


Welcome back Readers!

This week we’re going to take a look back at the very first Ops@Home topic.  Laundry Day.

To recap, we had looked at ways to eliminate muda, or waste, from the laundry process.  Specifically, we looked at reducing the number of times each article was handled.  Less sorting, less effort, less time.  We also tried to minimize waiting for the washer and dryer by prioritizing the order loads get washed.

The experiments have been conducted, the results collected.  Data has been graphed and scrutinized and analyzed.  And here it is.

Let's start off with some assumptions:
  1. I didn't count and inventory each article of clothing.  I'm assuming a week's worth of cloths is about the same from week to week.
  2. I didn't include the baby's laundry which gets done multiple times a week or sheets and towels.  This was strictly done using the clothing of two adults.
  3. Time required to hang dry clothes was not included.  This varies depending on the temperature and humidity of my house or if the clothes are hung outside.
The initial process split the clothes into three loads, Cold Wash (Blue), Warm Wash (Red) and Delicate Wash.  In my case, I had too much clothing in the delicate pile for one load so it was split into two (Green and Purple).

This is what the time study for laundry day looked like:


From start to finish it took 5 hours and 42 minutes.  Now, a lot of this was hands off time as the washer and dryer runs automatically, the beauty of modern conveniences.  However, there was still intervention required during the sort, hang and fold operations.

One of the proposed changes was to eliminate the initial sort step by having a divided hamper and separating the clothes when they are placed in the hamper.  This seemed like a great idea, but from the time study you can see that this step really only took 5 minutes.

The cost of a new divided hamper would range from $40 - $100, which is a significant investment for little time savings.  The advantage to the sorting would be in the ability to easily delegate laundry to another member of my household.  The instructions for how things needed to be washed could be put on the bags and when a bag is full, anyone could toss it in the laundry.  Still not really worth the money for a new hamper.

So what did the revised process look like?


Looks better, doesn't it!  The process improvements brought the total time down to 3 hours and 50 minutes.

That's a savings of almost 2 hours!

A big time savings came from splitting the delicate load into two; one that went in the dryer and one that was hung to dry.  This eliminated one full dryer cycle, which doesn't eliminate much labour, does save on energy. The revised process also removed the bulk of the user intervention between wash and dry cycles.  Much less effort and labour.

To prioritize the loads, I used Johnson's Rule for n jobs on two machines.  This meant that the hang to dry load is done last, as it doesn't require the use of the second machine (the dryer)

During the summer, I hang the clothes outside to dry on the line and try to get them out as early as possible to try to maximize their time in the sun.  In that case, I wouldn't use the Johnson's Rule to prioritize the loads and would do the Hang to Dry load first.  Changing only the order of the loads in the Revised Process, we can see Johnson's Rule at work.


When the Hang to Dry load is done first, the dryer is idle until after the second load goes through the wash.  This extends the process time to 4 hours and 26 minutes.

Here is what the three versions of the process look like in comparison.  As you can see, even the ordering of the loads can have an impact on the process time.


So going forward, I'll skip the divided hamper and keep sorting and washing the loads as follows:
  1. Delicate Wash, Perma Press Dry
  2. Cold Wash, Normal Dry
  3. Warm Wash, Normal Dry
  4. Delicate Wash, Hang to Dry
At least until it's warm enough to hang the clothes outside.

Happy Wash Day!

Thursday, 27 February 2014

Process Improvement - Laundry Day Part 2


Welcome back to our foray into Laundry Day.  We're going to continue with the PLAN phase of our process improvement.

As a recap, let's take another look at the Future State of our Laundry Day process..


We'll begin our next step by looking at the most labor intensive steps and see where we can reduce unnecessary movements.

Tuesday, 25 February 2014

Process Improvement - Laundry Day Part 1


People told me babies created laundry.  I didn't understand how this was possible.  Baby clothes are so tiny, how could it be a lot of extra laundry.  I now understand.  Its not just little sleepers, its loads of wash cloths, receiving blankets and bibs.  Plus extra adult clothes for the barrage of drool and spit-up endured daily.  There is a lot of laundry.

Living in an area with time of use electricity billing, I try to confine laundry to cheaper off-peak hours.  This typically means all laundry gets done on one day of the weekend.  That means fitting a lot of laundry into as little time as possible.

I am also a laundry fanatic.  I firmly believe if the tag says hang to dry, you hang to dry.  If it is wash in cold, you wash it in cold.  If you are a person who crams as much as possible into one load and dries everything as hot and as quickly as possible, this will not help you.  But don't be surprised if your new pants are an inch shorter than in the store, your white shirt is now pink and your black sweater barely passes for charcoal grey anymore.

So how can we improve the process of laundry day?  To begin our kaizen, we'll start with the classic tome, Jeffery Likers' The Toyota Way.